

Showing posts with label DIY. Show all posts
Showing posts with label DIY. Show all posts
11.20.2010
New Cake Stands in Shop
Hello! Quick etsy store update - just added 2 new cupcake stands this one and this one. The first cake stands that sold from the store ended up being used for a tea party themed baby shower. The buyer was kind enough to send me a few photos. I thought the spread looked really nice! To make the poms hanging above she followed this tutorial via Martha Stewart. The sign holders where from a DesignSponge tutorial. Many thanks to Liesel for sharing!


3.28.2010
Hair Flower
Today I'm proud to bring you my hair flower for the wedding. I need to get a clip for the back so it can actually be placed in my hair but the overall flower is complete. I had some green and off white satin ribbon some faux pearls from a necklace my grandma gave to me, a little bit of sample lace from my dress and some off white tulle and dark green duponi-ish remnants. Enjoy!


3.19.2010
Button Bouquet
The newest wedding diy development I have to share with you is the button bouquet. This will be for our flower girl the "Mad-Rose", who will be donning a cute green, orange and pink polka dot dress.
This is another project I've seen in quite a few different places online and a fair amount of etsy sellers that have them available to buy. The concept is pretty simple, get some buttons, floral wire, floral tape and ribbon. I made a few little ribbon petals that were strung on before the last button. It was fun, took a while to actually get an arrangement, especially since I've never arranged a bouquet of anything. The whole process was overall was fairly intuitive.
This is another project I've seen in quite a few different places online and a fair amount of etsy sellers that have them available to buy. The concept is pretty simple, get some buttons, floral wire, floral tape and ribbon. I made a few little ribbon petals that were strung on before the last button. It was fun, took a while to actually get an arrangement, especially since I've never arranged a bouquet of anything. The whole process was overall was fairly intuitive.


2.18.2010
Much Belated Paper Bead Update
I was scrolling through some of my past posts and came upon the one about paper beads. I described the paper beads as being somewhat water repellent due to the clear acrylic coat I put on them. Well it turns out they are a bit more resilient than I anticipated!
This summer I made a simple paper bead bracelet for myself. I enjoyed it for about a month before accidentally leaving it in pocket. And as things go when one leaves things in pockets they end up taking a trip in the washing machine. After discovering what I had done to my bracelet I was pleased to see the bracelet was more or less intact. The beads seemed to have lost some of their pigment and were less shiny but overall the bracelet was still wearable. I probably should have tried to put another topcoat on the top after the washing machine incident but as it usually goes I forgot about it. Until my bracelet got washed a second time.
SHOOT!
That my friends is when the beads started to noticeably degrade, we experienced some major unraveling and the hemp became quite frayed. For as many times as I've washed and dried other things left in pockets - lip balm being the main culprit, which is a whole other can of worms - I never seem to learn my lesson. So ruined bracelets and oily spots on clothing still aren't enough to get me to remember to check my pants pockets before I chuck them into the laundry bin.
The pictures of my bracelet are pre-washing. I'll have to make another for this summer.

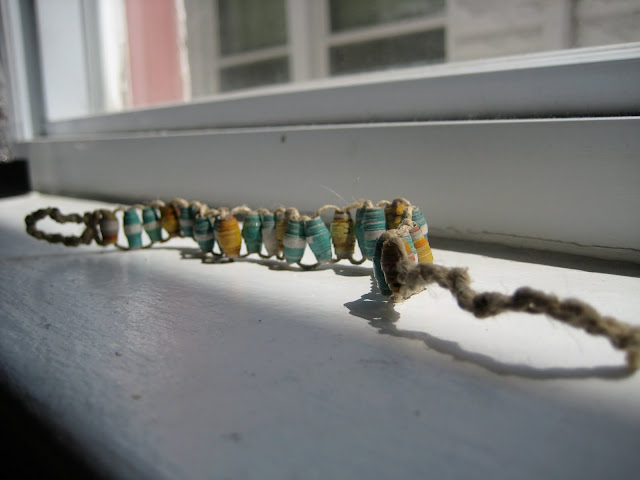
This summer I made a simple paper bead bracelet for myself. I enjoyed it for about a month before accidentally leaving it in pocket. And as things go when one leaves things in pockets they end up taking a trip in the washing machine. After discovering what I had done to my bracelet I was pleased to see the bracelet was more or less intact. The beads seemed to have lost some of their pigment and were less shiny but overall the bracelet was still wearable. I probably should have tried to put another topcoat on the top after the washing machine incident but as it usually goes I forgot about it. Until my bracelet got washed a second time.
SHOOT!
That my friends is when the beads started to noticeably degrade, we experienced some major unraveling and the hemp became quite frayed. For as many times as I've washed and dried other things left in pockets - lip balm being the main culprit, which is a whole other can of worms - I never seem to learn my lesson. So ruined bracelets and oily spots on clothing still aren't enough to get me to remember to check my pants pockets before I chuck them into the laundry bin.
The pictures of my bracelet are pre-washing. I'll have to make another for this summer.


2.17.2010
Wedding Garland
Hello friends! Today I return with another wedding decoration post. "paper garlands". Like all my other ideas this came from somewhere else. I thought it would be fun to hang it on the head table, gift table and cake table. We are not opting for the colored table linens so I thought these would bring a little brightness to those white table cloths.


2.09.2010
Wedding Shenanagins!
In an effort to share and thank those for posting great projects online I'm sharing my internet scrounging for DIY and re-purposed wedding projects with pictures of my DIY results.
Our centerpieces will utilize empty wine and spirits bottles paired with "floral poofs" made from the yellow pages. Via Jessi Hack Weddings Blog. The only thing I did differently was to round the corners before pulling them apart much like the Martha Stewart version which uses tissue paper. As far as the empty bottles go I would like to create a milk glass look like this. The large blue bottle in the middle will actually be filled with wine to serve at the tables. The petal shape motif comes from a DIY post on Design*Sponge. I'm planning on spray painting these yellow.


I also found the time this past weekend to rock out these stellar cupcake stands. Three separate trips to three different thrift stores gave me quite the collection of old plates and vases to work with. Some glue from JoAnn's and a couple hours Saturday afternoon resulted in these bad boys! So many places of inspiration for DIY stands all over the interweb: Ashley Ann Photography | The Crafty Nest | Elizabeth Ann Designs | Design*Sponge


 Enjoy! More DIY wedding shenanigans coming soon! For real, I promise. Plus I've got to get invites designed. The pressure is on...
Our centerpieces will utilize empty wine and spirits bottles paired with "floral poofs" made from the yellow pages. Via Jessi Hack Weddings Blog. The only thing I did differently was to round the corners before pulling them apart much like the Martha Stewart version which uses tissue paper. As far as the empty bottles go I would like to create a milk glass look like this. The large blue bottle in the middle will actually be filled with wine to serve at the tables. The petal shape motif comes from a DIY post on Design*Sponge. I'm planning on spray painting these yellow.


11.20.2008
Crafty
Ohh boy so a big epic fail on my part. I was totally into the whole blog thing for like a week and then I apparently got busy and stopped trying to output creative ideas on a consistent basis.
ANYwho... I've been busy with creative crafty things, just not design. I like to make things, I especially like to make things out of materials that might be considered garbage or something to throw away. Recycling/Upcycling whatever you want to call it - I'm all about it. It's become somewhat of an obsession of mine in the past year. I've come to the conclusion that I like handmade, usable art objects, and I like them to utilize materials that you have on hand.
So here are two examples of fun little holiday projects for friends. My beer cap ornaments and paper beads, made into bracelets. The beer cap ornaments were something I came up with last year. My sister recieved two of them for Christmas. A New Glarus, and a Leine's Red ornament I believe. I liked them so much I decided other people should get them this year as well, and I would like to have a few to adorn my tree as well.

The paper beads are not an original idea - I think I first heard about the idea on instructables.com from a threadbanger how to. Then I did more searching on the web and found a few different resources and saw some really neat stuff. Paper beads rock. I've coated mine with a clear acrylic so they should be somewhat impervious to water. I wouldn't submerge them or anything but if they get "splashed" on I think they'll hold up fairly well.


One last note: I'm totally against Christmas being out before Thanksgiving, or Halloween for that matter, especially in stores and on the radio - but when you handmake most of your presents you kind of need to plan ahead. I will probably be posting more artsy craftsy stuff for a bit here. I have plans for other handmade things so that, instead of sketching will be filling my time.
Peace!
ANYwho... I've been busy with creative crafty things, just not design. I like to make things, I especially like to make things out of materials that might be considered garbage or something to throw away. Recycling/Upcycling whatever you want to call it - I'm all about it. It's become somewhat of an obsession of mine in the past year. I've come to the conclusion that I like handmade, usable art objects, and I like them to utilize materials that you have on hand.
So here are two examples of fun little holiday projects for friends. My beer cap ornaments and paper beads, made into bracelets. The beer cap ornaments were something I came up with last year. My sister recieved two of them for Christmas. A New Glarus, and a Leine's Red ornament I believe. I liked them so much I decided other people should get them this year as well, and I would like to have a few to adorn my tree as well.


The paper beads are not an original idea - I think I first heard about the idea on instructables.com from a threadbanger how to. Then I did more searching on the web and found a few different resources and saw some really neat stuff. Paper beads rock. I've coated mine with a clear acrylic so they should be somewhat impervious to water. I wouldn't submerge them or anything but if they get "splashed" on I think they'll hold up fairly well.


One last note: I'm totally against Christmas being out before Thanksgiving, or Halloween for that matter, especially in stores and on the radio - but when you handmake most of your presents you kind of need to plan ahead. I will probably be posting more artsy craftsy stuff for a bit here. I have plans for other handmade things so that, instead of sketching will be filling my time.
Peace!
Subscribe to:
Posts (Atom)